April 01, 2016

// // 3 comments

OxygenOS 3.0 beta Build Now Available for OnePlus 2 [Download]

Some of you know, soak testing for OxygenOS 3.0 (based on M) started a few weeks ago, and now OnePlus ready to share it with us. OnePlus still want to ask the community for help to make sure OnePlus work out any remaining kinks before OnePlus OTA the build officially.
OnePlus 2
What’s available today is a daily-driver-material community release of 3.0. If you’re the type who won't mind rolling up your sleeves a bit to get your Marshmallow on, this one’s for you. OnePlus would like to ask for a little help with testing some aspects of the software that require a larger user base around the world. Here’s what OnePlus need your feedback on:
  • Network testing (how is this update working on your specific carrier, your specific region?)
  • Are you noticing improvements to the camera (both UI and picture quality)?
  • Performance and battery life - let us know how your phone runs.
This build is OTA eligible which means you’ll receive future OTAs on this build so don’t worry about not getting updates if you flash this.

Here’s what’s new in this build:

  • Android 6.0.1 Marshmallow upgrade 
  • New OnePlus Camera UI
  • UI has been cleaned up: swiping up/down now switches between photo/video, whereas HD/HDR and flash settings live in the top right corner
  • You can now change the aspect ratio and toggle grid view without going all the way to the settings
  • New wallpaper picker
  • Easily preview and set both home screen and lock screen wallpaper in one place.
  • Shelf UX has been improved
  • No more edit mode, long press boards to rearrange or remove
  • General system performance improvements
  • Benchmarked 47% faster than OxygenOS 2.2.1 on key test scenarios
  • Fingerprint performance improvement
  • Tested 45% faster than OxygenOS 2.2.1 on average
  • Settings changes
  • Old app permissions are gone, say hi to new (native Android) app permissions.
  • Alert Slider has its own entry point with more customization options
  • Improved settings menu readability by changing the order a bit
  • March security patches

There are a few things we want you to be aware of:

  • Your fingerprints will not be preserved after you flash the new build, so you will need to re-register your fingerprints if you have fingerprint authentication set up
  • Maxxaudio tuner and presets will be removed
  • Rolling back to previous OxygenOS versions will not work without wiping data
  • Some soak testers have experienced wifi speed issues which we are investigating
  • Some of your old apps won’t work without an upgrade to M compatible versions
  • Shelf frequent apps board size might shrink if you are dirty flashing. Remove and re-add the board and it will fix itself
  • Language localization is still being improved
As always, please read the instructions on our How to post carefully before flashing your device. Flashing may lead to loss of data and damaged hardware if not done properly. A few important things to note:

This build only support dirty flashing using Oxygen recovery. 

Dirty flashing (that means flashing the update without wiping data or factory resetting first) requires OxygenOS 2.2.0 or higher.

Factory reset is needed if you are using any other recovery or coming from any other ROM. We do not guarantee these cases to work properly. 

We ALWAYS recommend backing up all your important personal data before flashing.

Read More

November 12, 2015

// // 4 comments

Install MIUI 7 on Xiaomi MI 4i Global LXIMICI [Stable]


Great performance isn't the only reason why people prefer Mi phones. MIUI operating system that's deeply customizable, beautiful and great for productivity and play. It's so easy to use and now supports Android L, so you can take full advantage of Mi 4i's 64-bit processor. Give Mi 4i a try, I  believe you'll fall deeply in love with the all-new MIUI 7.

The MIUI 7 for the Xiaomi MI 4i (codename ferrari) provides MI User Interface, which itself is based on Android 5.0.2 Lollipop. The ZIP archive comes in at 890 MB. The content you care most about, redesigned in a way that's refreshing, yet familiar. Fast, power efficient, MIUI 7 offering the best MIUI experience to date.
Xiaomi MI 4i

You can update Xiaomi MI 4i to Android 5.0.2 MIUI 7 Lollipop ROM using the tutorial below. This is an official release by MIUI, a custom ROM which would require a custom recovery like ClockworkMod in order to flash the ROM zip files on your phone. Also make sure, your warranty will be voided when you install this custom ROM.
NOTE : Please wipe all data in Recovery mode if you want to update to a discontinuous ROM version, or downgrade to an older ROM version using MIUI full ROM pack.
As you continue reading below, we will guide you through how to backup data, some other important tips and the entire process of how to install MIUI 7 Lollipop ROM on Xiaomi MI 4i with complete steps.

Let’s get on with the tutorial now and make sure you backup your Phone as given below, because all the data will wiped during the installation process. The following tips are important as they will help the installation procedure to go smooth without any issues. Let’s begin with the tutorial below.

Disclaimer: All the custom ROMs and firmwares, official software updates, tools, mods or anything mentioned in the tutorial belong to their respective owners/developers. We (iDroid Horizon) or the developers are not to be held responsible if you damage or brick your device. We don’t have you on gun point to try out this tutorial.

Backup and some important tips

Backup your all important data and apps because during any installation of a new custom ROM or Official Firmware , your device will be wiped and cleaned with new operating system. Make a backup for just in case, you never know when anything might go wrong. Read below for some important tips on how to backup Android data in a easy process:

Few more important things that you must remember before installing any custom ROMs or Official Firmwares:

  • You might face some problems in connecting your Android device to the computer. How to fix? You need to enable USB debugging mode.
  •  Make sure your Android device is charged up to 80-85% battery level. This might help you: How to Check Battery Percentage.  Why? Because, if your phone goes off suddenly while installing a custom ROM, flashing an official firmware update or installing mods etc. — your phone might get bricked or go dead permanently. No one wants that, right?
  • Most of the tutorials and how-to guides on iDroid Horizon are for factory unlocked Android phones and tablets. We recommend NOT to try our guides if your phone is locked to a carrier, unless we have specified the carrier name or device model. And also make sure you have an unlocked bootloader (except Samsung).
If you find the above tips useful and they were helpful to you, please consider giving us a +1 or LIKE to thank us!

All set and ready? Good. Now, let’s proceed with the tutorial below and update Xiaomi MI 4i to Global MIUI 7 Stable firmware.

Also Read : Root and Install TWRP on Xiaomi MI 4i without using PC [How to Guide]

How to Install LXIMICI MIUI 7 Lollipop on Xiaomi MI 4i:

We have put together a detailed step-by-step instructions guide on how to install LXIMICI MIUI 7 Global ROM on Xiaomi MI 4i. If you are used to installing custom ROMs on your Xiaomi MI 4i, then this should not be any different for you.

To Remember:
  • This MIUI 7 Global ROM tutorial is only for the Xiaomi MI 4i phone.
  • Make a Nandroid backup of your previous phone set up before proceeding – for just in case anything goes wrong.
  • This tutorial will wipe out all your existing data. Proceed at your own risk.

Complete Step-By-Step Instructions:

Step 1 - Download MIUI 7 Global Stable ROM for Xiaomi MI 4i on your PC, if you haven’t already.

Step 2 - Connect your Xiaomi MI 4i to your computer using the USB cable.

Step 3 - Now copy/paste the downloaded MIUI 7.0.3.0 LXIMICI file into the folder downloaded_rom in Internal Storage of your device.


Step 4 - Launch ‘Updater' app on your device:
  • For MIUI 6:Click the ‘…’ icon at the top-right corner, select ‘Choose update package’, and choose the ROM file you’ve put in ‘downloaded_rom’.
  • For MIUI V5:Press the Menu button, select ‘Choose update package’, and choose the ROM file you’ve put in ‘downloaded_rom’.
After choosing the right ROM file, your device will begin upgrading. Your device should automatically boot to the new version when the update is completed.

Your Xiaomi MI 4i will boot now and it might take about 15 minutes to boot on your first time. So, please wait.

That’s it! Your Xiaomi MI 4i should now have MIUI 7 Lollipop custom ROM installed on your phone! Go to Settings > About phone to verify.

Hit +1 or LIKE to thank us!

Have fun playing with the new MIUI 7 Lollipop. All the instructions are clearly given above, but if you have any issues, please let us know by commenting below.
Read More

June 21, 2015

// // 12 comments

YouTube Money: Earn between $100 - $200 per Day Online

You might have already read what I have posted earlier about Earnings via Android device with High Paying mCent App for mobile recharge and the Killer the article of Earning real Cash of Some Dollars with those Money Source Android App of Google Play Store. Now this is the another article of the same trending topic i.e. $$ Earning Dollars $$ ! But the process is now somewhat different.

What if I told you there was a legitimate and easy way to earn between $100 - $200 per day online, without all the other crap you've tried that doesn't work? You can now Fly Under the Radar generating Easy Cash and Traffic while other do the Hard Work.
NOTE : This is 100 % Legal Trick you can use without any Risk !

Something you can do :

  • Without any Cash Investment
  • Without a Website or Hosting
  • Without Creating Content
  • Without Sales Skills or Experience
Introducing ClipJacker Legal Software Hijacking Free Tool that Hijacks YouTube and Injects any video with your affiliate Links. If you can click a mouse, you can profit from online video!
Recent news articles show how some YouTubers are earning upwards of $100,000 per year from the ads they display on and around their videos. 
YouTubers Earnings

What if you could earn money from those ads, without actually creating the content ?

Answer is "YES". You can earn without actually creating the content. Excited to know ? Good. Just read below. I am providing the Most amazing Tricks to Earn via YouTube without creating the contents. 

How to Earn via YouTube without creating contents :

Instead of sharing videos you find on YouTube, you can load those same videos into your free ClipJacker account and share that link instead.

We'll create a page that will embed the video just like on YouTube, it will still have the capacity to go viral, but now you earn ALL the revenue from the ads displayed on the page!

Step 1 : Take any YouTube video of your choice.

Step 2 : Load the URL into your ClipJacker account and now every ad on the page makes YOU money!
  • The entire process is super simple and takes literally seconds to do!
  • The ads displayed are automatically related to the content of the video
  • Use personalized ads that link to your own websites or affiliate programs!
You already share videos around the internet, so why not make money from something you're going to do anyway?

Here are just a few of the ways you will benefit using ClipJacker :

  • Share videos in related forums. You could post a 'golf bloopers' video in golfing forums, sending hoards of targetted traffic to your golf related affiliate offers (posting affiliate links in forums is frowned upon, but this way it goes unnoticed and the members will actually like the video anyway).
  • You can use product reviews made by others, and surround the videos with your affiliate links for that very product! (All completely legally)
  • Share the latest buzz videos on Facebook and other social networks and watch them go viral on your video pages instead of on YouTube itself.
  • Profit from any niche you like, there are already experts discussing all kinds of topics on YouTube, cash in on their knowledge without the research and hard work!
  • Earn commissions from anyone who signs up to ClipJacker after visiting one of your video pages
  • Anybody can do it as there is zero technical knowledge required!
Like this Trick ? Don't forget to Share this with your friends. If you need any Help for this YouTube Earning Trick, please leave a comment below! We will reply you back As Soon As Possible with the Troubleshooter of your problem. Hit 1+ or LIKE us on Facebook to thank us.
Read More

June 20, 2015

// // 1 comment

Update T-Mobile Galaxy S6 Edge to Android 5.1.1 Lollipop Official Firmware

Samsung has never been the fastest when it comes to updating to newer versions of Android but thankfully this situation has changed a bit with Lollipop, as the Korean giant has done a pretty good job of pushing the update out to many of its flagship devices. Of course, Android isn’t standing still and due to a number of bugs and performance issues, it recently made the jump from Android 5.0.x to 5.1. How long before Samsung follows suit? Sooner than you’d think.

Up until now, Android 5.1 had been exclusive to Nexus, Android One, and GPe devices, but several reports are coming in that suggest that T-Mobile is now rolling out an update to the Samsung Galaxy S6 Edge that brings its software up to version 5.1.1. Yes, you read that right. Samsung isn’t just jumping up to 5.1, they are getting the very latest version of it (5.1.1) — an update that so far hasn’t even hit any Nexus devices, at least outside of the Nexus Player.

If you want to get this latest firmware on your Galaxy S6 SM-G925T, then we have a complete guide on how to install UVU2COF6 Android 5.1.1 Lollipop on Galaxy S6 G925T device manually with Odin.

Please keep in mind that this is an Official Firmware, not a modified custom ROM. You can easily install UVU2COF6 Android 5.1.1 Lollipop on Galaxy S6 G925T using our tutorial given below. I recommend you to read this article once before actually performing it on your device.

T-Mobile Galaxy S6 Edge

As you continue reading below, we will provide you all the necessary tips like How to Backup Android Devices before installing any official firmwares or custom roms and many more. We will install this official firmware by using ODIN which is the safe method to manually install a new firmware update on your phone.
Remember! If the flashing process is interrupted (e.g. with KIES) your phone might be very difficult to revive. So I recommend you to update your Android device manually using our tutorial below. Firmwares provided by iDroid Horizon are not modified, provided ‘as is’ from Samsung/Google servers.
Disclaimer: All the custom ROMs and firmwares, official software updates, tools, mods or anything mentioned in the tutorial belong to their respective owners/developers. We (iDroid Horizon) or the developers are not to be held responsible if you damage or brick your device. We don’t have you on gun point to try out this tutorial

Details about UVU2COF6 Android 5.1.1 Lollipop Firmware:

  • Model : SM-G925T
  • Model name :  GALAXY S6 Edge
  • Country : USA (T-Mobile)
  • Version :  Android 5.1.1
  • Changelist : 90673209
  • Build date : Thu, 11 Jun 2015 13:16:09 +0000
  • Product code : TMB
  • PDA : G925TUVU2COF6
  • CSC : G925TTMB2COF6

Android USB Driver for T-Mobile Galaxy S6 SM-G925T

You must have USB Driver installed in your Computer to connect your Android Device. Please make sure you have installed it before flashing any ROMs or Firmware. If you don't have USB Driver from before, you can download the latest  official USB Driver from our Android USB Driver Section here:

Backup and some important tips

Backup your all important data and apps because during any installation of a new custom ROM or Official Firmware , your device will be wiped and cleaned with new operating system. Make a backup for just in case, you never know when anything might go wrong. Read below for some important tips on how to backup Android data in a easy process:
Samsung user can also backup data by using Official Sumsang Kies. If you backup data manually, you will get more options for what to choose from. You can also move your data to other Android devices from different manufacturers, i.e moving Samsung Galaxy S6 backup data to Google Nexus 10. If you already have a custom recovery (ClockworkMod, TWRP etc.) installed on your phone, we strongly recommend a backup using that as it creates a complete image of your existing phone set up.

Few more important things that you must remember before installing any custom ROMs or Official Firmwares:

  • You might face some problems in connecting your Android device to the computer. How to fix? You need to enable USB debugging mode. 
  •  Make sure your Android device is charged up to 80-85% battery level. This might help you: How to Check Battery Percentage.  Why? Because, if your phone goes off suddenly while installing a custom ROM, flashing an official firmware update or installing mods etc. — your phone might get bricked or go dead permanently. No one wants that, right?
  • Most of the tutorials and how-to guides on iDroid Horizon are for factory unlocked Android devices. We recommend NOT to try our guides if your device is locked to a carrier, unless we have specified the device model or carrier name.
If you find the above tips are helpful for you, please consider giving us a +1 or Like on our Facebook Fan Page to thank us!

All set and ready? Good. You can now proceed to the tutorial below and update T-Mobile Galaxy S6 G925T to UVU2COF6 Android 5.1.1 Lollipop official stock firmware.

How to Install UVU2COF6 Android 5.1.1 Lollipop on Galaxy S6 G925T

We have put together all detailed step-by-step  guides on how to update Samsung Galaxy S6 G925T to UVU2COF6 Android 5.1.1 Lollipop. If you are used to installing official updates through ODIN on Samsung Galaxy devices, then this should not be any different for you. Please read every line carefully and make sure you read the entire tutorial once before actually performing it on your phone.

To Remember:
  1. This tutorial for installing UVU2COF6 Android 5.1.1 is only for Samsung Galaxy S6 G925T. Please don’t try this with other Android device.
  2. This is an official Samsung firmware, not a custom ROM or a modified firmware.
  3. Make sure you backup all your data in your phone before proceeding.
    Rooting Warning: This is an official Android 5.1.1 build UVU2COF6 update for Galaxy S6 G925T, which means you will lose root after installing this update. You will again have to root Galaxy S6 to gain full system access and be able to install root apps again.

    Entire Step-By-Step procedure:

    Step 1 - Download UVU2COF6 Android 5.1.1 for T-Mobile Galaxy S6 G925T to your computer and extract the zip file.

    Step 2 - Download ODIN v3.07 which will help you to install Android 5.1.1 on Samsung Galaxy S6 G925T.

    Step 3 - Switch OFF your phone. Now go to Download Mode. How? Press and hold the Volume Down + Home buttons together, and then press the Power button till you see the construction Android robot and a triangle. Press Power again to confirm to enter into Download Mode.

    Step 4 - Make sure you have your Galaxy S6 G925T USB drivers installed on your computer.

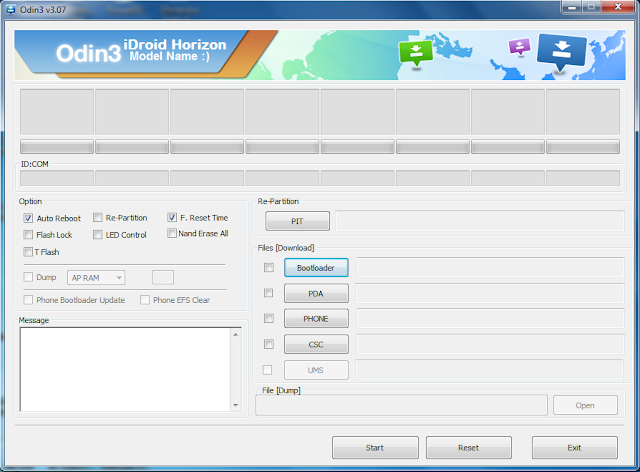
    Step 5 - Open ODIN on your computer. Connect your phone to your computer while your phone is in the Download Mode.

    Odin

    Step 6 - If your phone is connected successfully, one of the ID:COM boxes will turn yellow with the COM port number. This step might take some time.

    Step 7 - Now select the files that you have to flash/install on your phone. These files are to be found from the extracted files in Step 1.
    • Click on ‘PDA’ and select file with ‘CODE’ in its name.
    • Click on ‘Phone’ and select file with ‘MODEM’ in its name. Ignore this step if there is no such file.
    • Click on ‘CSC’ and select file with CSC’ in its name. Ignore this step if there is no such file.
    • Click on ‘PIT’ and select the .pit file. Ignore this step if there is no such file.
    Step 8 - In ODIN, check the Auto Reboot and F. Reset Time options. As for the Re-Partition option, check it ONLY if you selected a .PIT file in the above step.

    Step 9 - Now click on the Start button in ODIN. Installation process will start and would take a few minutes to complete.

    Step 10 - After the installation is completed, your phone will restart. After you see the home screen, unplug your phone from the computer.

    That’s it. Your Samsung Galaxy S6 has now been updated to Android 5.1.1 build UVU2COF6 software update. Go to Settings > About phone to verify what build have you installed.

    Hit +1 or Like on Facebook to thank us!

    What are your thoughts about the Android 5.1.1 update for the Samsung Galaxy S6 and S6 Edge? Please leave a comment!
    Read More

    June 19, 2015

    // // 2 comments

    [UPDATE] Modern Combat 5 Blackout v1.3.1a Exclusive Files – Download Now

    We have already posted Modern Combat 5 Blackout 1.3.0j (Summer Update) Data + APK Download links. Yesterday (June 18, 2015), Gameloft has added an exclusive update for this Modern Combat 5 Blackout Game. The game has been updated to version 1.3.1a which include many more features and some minor bugs has been fixed permanently. Let’s celebrate summer with some deadly new gear in your #1 mobile first-person shooter!

    Modern Combat 5 Blackout v1.3.1a

    What's New in Modern Combat 5 v1.3.1a Exclusive Package :

    • Hit the deck! A barrage of new features is heading right for Modern Combat 5 in this exciting new update.
    • SUPPORT CLASS REPORTING FOR DUTY!
    • Heal allies
    • Let your teammates respawn on the spot they died
    • WEAPONS APLENTY
    • Extra weapon tier
    • New Light Machine Gun
    • ALL-NEW MULTIPLAYER MODE: ZONE CONTROL
    • Capture and defend areas to rack up score superiority
    • CONTROLLER SUPPORT
    • Standard, form-fitting and extended controller
    • MORE CHARACTER CUSTOMISATION
    • Weapon camos, masks, logos and kill signs
    Remember, before downloading Modern Combat 5 Blackout v1.3.1a, make sure you have Modern Combat 5 Blackout v1.3.0j (Summer Update) Data + APK installed in your phone. If you don't have, Grab it now from here : 
    Modern Combat 5 Blackout 1.3.0j (Summer Update) Data + APK – Download Now
    Or Skip if you already have installed it on your phone.

    Minimum System Requirements for v1.3.1a

    • CPU : armeabi-v7a,x86
    • Android Version : Ice Cream Sandwich 4.0.x
    • Screen : normal
    • GPU : 2.0
    SHA1: EB:B8:A6:58:8F:72:89:48:8F:8D:30:D1:1D:C0:20:BC:8D:4C:FB:0C
    MD5: a96e244940d07cc89609e98ebec9351b
     Also See this Trending Games :
    You can now Update this awesome game from Google Play Store directly. But if you already have Modern Combat 5 Blackout 1.3.0j (Summer Update) and want only to download the Exclusive files of Modern Combat 5 Blackout v1.3.1a, you can download it from below link :

    Download Modern Combat 5 Blackout v1.3.1a (46.45 MB Update) :

    NOTE : Better Use PC Or Download Manger Program For Download.
    P.S :  Cheat detection is now more powerful in this game. So I will suggest you to keep away from MOD APK and play original version of modern combat 5 to avoid BAN from Gameloft.
    Like this Game ? Don't forget to Share this with your friends. If you found any Problems in Downloading or Playing this Game, let me to know by commenting below. I will reply to back As Soon As Possible with the Troubleshooter of your Problem. Hit 1+ or LIKE us on Facebook to Thank us. 
    Read More

    June 17, 2015

    // // 1 comment

    [June 2015 Update] CyanogenMod 12.1 on Galaxy S4 Mini Lollipop ROM

    The days keep passing and found the new version of CyanogenMod 12.1 for key devices, although in fact there are already many Android devices compatible with CM12.1 Everyone has looked for ways to upgrade your device to the latest Android 5.1.1 Lollipop and since many do not receive the official update choose to seek a custom ROM and what better to use the more famous [CM12.1 cm-12.1-20150616-NIGHTLY-serrano3gxx.zip] highlighting its simplicity, its customization options and based on the latest Android Lollipop .

    CyanogenMod 12.1 on Galaxy S4 Mini

    CyanogenMod 12.1  Android 5.1.1 on Galaxy S4 Mini Lollipop

    This version is the first that has been ported or developed directly for the Samsung Galaxy S4 Mini (3G) and it is now possible to test it in our devices, but also run directly to install because although most of the features are operating normally have errors that are considered important so you may not be able to take advantage of this rom for daily use.
    NOTE : The bugs that are currently in this version of Lollipop hand CyanogenMod for Samsung Galaxy S4 Mini have not yet been published so know that things go wrong , but as we know work perfectly.
    You can update Galaxy S4 Mini to Android 5.1.1 CyanogenMod 12.1 Lollipop custom firmware using the tutorial below. This is not an official release by Samsung, but just a custom ROM which would require a custom recovery like ClockworkMod in order to flash the ROM zip and Google Apps zip files on your phone. Your Galaxy S4 Mini should be rooted and have a custom recovery (ClockworkMod recovery / TWRP recovery) installed.
    NOTE : This is the LATEST Update of CyanogenMod 12.1 (cm-12.1-20150616-NIGHTLY-serrano3gxx.zip)  Nightly ROM released on 16 June 2015.
    Disclaimer: All the custom ROMs and firmwares, official software updates, tools, mods or anything mentioned in the tutorial belong to their respective owners/developers. We (iDroid Horizon) or the developers are not to be held responsible if you damage or brick your device. We don’t have you on gun point to try out this tutorial.

    There are tons of useful articles and how-to guides on iDroid Horizon for the Samsung Galaxy S4 Mini I9190, but we think you might be interested in the following posts:
    Like this CyanogenMod 12.1 based on the latest Android 5.1.1? We love it too and we know you are looking forward to install it on your phone now. Now please read below for important tips on how to make sure your installation goes smooth and you do not end up with any problems.

    Samsung Galaxy S4 Mini Drivers :

    You will need to connect your Android phone with the computer. For that, please make sure you have installed the USB drivers for Samsung Galaxy Note 2 properly. If not, you can download the latest official drivers from our Android USB Drivers section here:

    Backup and some important tips :

    Done with USB Driver? Good. Now here we go for some work that you must do before installing this firmware. Please follow the important points that you need to take care of, as we don’t want anyone losing their personal data or apps:

    Backup your all important data and apps because during any installation of a new custom ROM or Official Firmware , your device will be wiped and cleaned with new operating system. Make a backup for just in case, you never know when anything might go wrong. Read below for some important tips on how to backup Android data in a easy process:
    Samsung user can also backup data by using Official Sumsang Kies. If you backup data manually, you will get more options for what to choose from. You can also move your data to other Android devices from different manufacturers, i.e moving Samsung Galaxy S5 backup data to Google Nexus 10.

    If you already have a custom recovery (ClockworkMod, TWRP etc.) installed on your phone, we strongly recommend a backup using that as it creates a complete image of your existing phone set up.

    Few more important things that you must remember before installing any custom ROMs or Official Firmwares:

    • You might face some problems in connecting your Android device to the computer. How to fix? You need to enable USB debugging mode.
    •  Make sure your Android device is charged up to 80-85% battery level. Why? Because, if your phone goes off suddenly while installing a custom ROM, flashing an official firmware update or installing mods etc. — your phone might get bricked or go dead permanently. No one wants that, right?
    • Most of the tutorials and how-to guides on iDroid Horizon are for factory unlocked Android devices. We recommend NOT to try our guides if your device is locked to a carrier, unless we have specified the device model or carrier name.
    If you find the above tips are helpful for you, please consider giving us a +1 or Like on our Facebook Fan Page to thank us!

    All set and ready? Good. Now, let’s proceed with the tutorial below and update Galaxy S4 Mini I9190 to CyanogenMod 12.1 Lollipop custom firmware.

    How to Install CyanogenMod 12.1 on Galaxy S4 Mini :

    We have put together a detailed step-by-step instructions guide on how to install CyanogenMod 12.1 Lollipop custom firmware on Galaxy S4 Mini. If you are used to installing custom ROMs on your Galaxy S4 Mini, then this should not be any different for you.

    However, for beginners, you need to root your Samsung Galaxy Note 2 and install a custom recovery. Please Google that up if you are unsure and make sure you read the tutorial once before actually performing it on your device.

    To Remember:
    • This tutorial is only for installing CyanogenMod 12.1 on Samsung Galaxy S4 Mini. Please do not try on any other Galaxy S4 variants.
    • Your phone should be rooted and have ClockworkMod recovery installed from before.
    • This tutorial will wipe out all your data. Proceed at your own risk.
    • Perform a Dalvik Cache wipe before proceeding from the recovery mode.
    • Samsung KIES will NOT detect your phone after installing this ROM because it is a custom firmware.
    • Make sure you backup all your data in your phone before proceeding.

    Entire Step-By-Step procedure :

    Step 1 - Download CM 12.1 Android 5.1.1 Lollipop Custom firmware and Google Apps for Galaxy S4 Mini to your computer.

    CyanogenMod 12.1 for Galaxy S4 Mini

    Step 2 - Connect and mount your Galaxy S4 Mini USB memory on your computer using the USB cable.

    Step 3 - Now copy/paste the downloaded Android 5.1.1 ROM zip file to your SD card. Make sure the file is in the SD card root (not in any folder).

    Step 4 - Then turn OFF your phone and disconnect from the USB cable.

    Step 5 - Now to get in the Recovery Mode. Switch ON the phone while pressing and holding Volume Up + Home + Power buttons together. You will get an exclamation mark now. Again, hold your Volume Up + Power buttons. You should now be in your Recovery Mode.

    Step 6 - Once you are in ClockworkMod Recovery, select perform a full data wipe by selecting “wipe data/factory reset”  Use the Power button to select everything while in the Recovery Mode.

    Step 7 - Then, perform a cache wipe by selecting “wipe cache partition” 

    Step 8 - Now this is optional, but it is recommended to perform a wipe of your dalvik cache as well. You will not get into boot loops or any other errors. From CWM recovery, go to ‘advanced’ and then select “wipe dalvik cache”.

    Step 9 - Then go back to the main recovery screen and select “install zip from SD card”.

    Step 10 - Now select “choose zip from sdcard”. Using your volume keys, navigate the CyanogenMod 12.1 ROM Zip file that you copied to your SD card and select it using the Power button. Confirm the installation on the next screen and the installation procedure should start now.

    Step 11 - After the installation completes, go to “+++++Go Back+++++” and reboot the phone by selecting “reboot system now
    Note: Repeat the same step of installation as in step 10 with Google Apps after installing CyanogenMod 12.1 Lollipop Custom Firmware.
    Your Galaxy S4 Mini I9190 will boot now and it might take about 5 minutes to boot on your first time. So, please wait.

    That’s it! Your Galaxy S4 Mini I9190 should now have CyanogenMod 12.1 Lollipop Custom ROM installed on your phone! Go to Settings > About phone to verify.

    Need Help?

    If you run into any problems during UPDATING Galaxy S4 Mini to CyanogenMod 12.1 Lollipop Custom ROM,  feel free to drop us a comment below and we will reply you back ASAP with the fix or the solution to your problem.
    Read More

    June 14, 2015

    // // 3 comments

    Dead Trigger 2 v0.09.6 Mega MOD Data + APK – Download Now

    Dead Trigger 2 is a zombie-themed first person shooter video game developed and published by Madfinger Games. It was released for Android and iOS devices on 23 October 2013, and for Facebook on 20 February 2014.

    As with the original Dead Trigger, Dead Trigger 2 is a single-player zombie-themed shooter. Nvidia showcased Dead Trigger 2 as the first tech demo for their upcoming Tegra 4 mobile system-on-a-chip; Slide to Play and Android Police compared the graphical quality to the Xbox 360 and PlayStation 3.

    Dead Trigger 2 v0.09.6

    Dead Trigger 2 utilizes the Unity game engine. It is planned to be released as a free-to-play game; microtransactions may be included in the final product, but developers are testing the game without in-app purchases to make sure the core gameplay works without them.

    Also See this Trending Games :
    You can now Update this awesome game from Google Play Store directly. But if you want to Download Dead Trigger 2 v0.09.6 Mega MOD Data + APK manually, you can Download from the link given below. For this Game, downloading from Play Store is risky. Why? Because No Secure Resume Capacity for such a Big Size Game. Also you will get the Mega MOD for Dead Trigger 2 v0.09.6 from here.

    Features Included :

    • Travel across 10 regions in different parts of the world.
    • Explore 30 unique environments.
    • Grab your favorite Zombie annihilator from 35 kinds of weapons.
    • Go for the action in more than 600 gameplay scenarios.
    • Participate in global missions and receive rewards. Complete achievements, meet challenges and receive exclusive in-game currency.
    • Explore your personal hide-out and meet the Gunsmith, Medic, Scientist, Smuggler and Engineer. These NPCs will help you unlock incredible new weapons and gadgets.

    What’s New in Dead Trigger 2 v0.09.6 ?

    • Come and celebrate exciting Eastern Carnage of Dead Trigger 2 with golden gun.
    • Easter gifts & decorations
    • Golden AK74 with improved stats for zombie hunters with style
    • New tournament tour at China’s Great Wall
    • Permanent application of all current discounts
    • Plenty of improvements for best performance of all devices

    Dead Trigger 2 v0.09.6 Mega MOD Info :

    • Infinite Ammo
    • No Reload
    • No Heat Gun
    • Attack From Far Away
    • High Damage
    NOTE: Device Operating System must be Android 4.0 Ice Cream Sandwich to Up

    Download Dead Trigger 2 v0.09.6 Mega MOD Data + APK Files : 

    MOD MirrorsObb Cache Mirrors
    P.S : Dead Trigger 2 v0.09.6 MOD APK and Data Files are Modified by OnHax.net. So all credit goes to them.

    How to Install Dead Trigger 2 v0.09.6 Mega MOD Data + APK ?

    • Uninstall any previous version of Dead Trigger 2 (IF INSTALLED)
    • Download and Install the APK from the links given above
    • Download and Extract the Obb cache into sdcard0/Android/Obb
    • Done ! Enjoy the Game !
    Like this Game ? Don't forget to Share this with your friends. If you found any Problems in Downloading or Playing this Game, let me to know by commenting below. I will reply to back As Soon As Possible with the Troubleshooter of your Problem. Hit 1+ or LIKE us on Facebook to Thank us. 
    Read More
    // // 2 comments

    Install CyanogenMod 12.1 on YU Yureka AO5510 - Nightly ROM

    A nightly has appeared for the Yu Yureka (Code name: tomato), a more powerful handset that trades out the Snapdragon 410 for the 615. Its nightly comes in at a slightly larger 366MB.

    Since these devices ship with Cyanogen OS out of the box, flashing CyanogenMod won't provide as stark a difference as you would see replacing the likes of TouchWiz or Sense. But for tinkerers, that's hardly the point. Regardless, these nightly builds are uploaded daily, and stability may not come as part of the package.
    YU Yureka AO5510
    You can update YU Yureka AO5510 to Android 5.1 CyanogenMod 12.1 Lollipop custom firmware using the tutorial below. This is an official release by CyanogenMod, a custom ROM which would require a custom recovery like ClockworkMod in order to flash the ROM zip and Google Apps zip files on your phone. Also make sure, your warranty will be voided when you install this custom ROM.
    NOTE : This is the LATEST Update of CyanogenMod 12.1 (cm-12.1-20150613-NIGHTLY-tomato.zip) Nightly ROM released on 13 June 2015.
    As you continue reading below, we will guide you through how to backup data, some other important tips and the entire process of how to install CyanogenMod 12.1 Lollipop ROM on YU Yureka AO5510 with complete steps using CWM Recovery.

    Let’s get on with the tutorial now and make sure you backup your Phone as given below, because all the data will wiped during the installation process. The following tips are important as they will help the installation procedure to go smooth without any issues. Let’s begin with the tutorial below.

    Disclaimer: All the custom ROMs and firmwares, official software updates, tools, mods or anything mentioned in the tutorial belong to their respective owners/developers. We (iDroid Horizon) or the developers are not to be held responsible if you damage or brick your device. We don’t have you on gun point to try out this tutorial.

    Micromax YU Yureka AO5510 USB Drivers

    You will need to connect your Android Phone with the computer. For that, please make sure you have installed the USB drivers for YU Yureka properly. If not, you can download the latest official drivers from our Android USB Drivers section here:

    Backup and some important tips

    Backup your all important data and apps because during any installation of a new custom ROM or Official Firmware , your device will be wiped and cleaned with new operating system. Make a backup for just in case, you never know when anything might go wrong. Read below for some important tips on how to backup Android data in a easy process:

    Few more important things that you must remember before installing any custom ROMs or Official Firmwares:

    • You might face some problems in connecting your Android device to the computer. How to fix? You need to enable USB debugging mode. See here: How to Enable USB Debugging — for Gingerbread, Ice Cream Sandwich and KitKat.
    •  Make sure your Android device is charged up to 80-85% battery level. This might help you: How to Check Battery Percentage.  Why? Because, if your phone goes off suddenly while installing a custom ROM, flashing an official firmware update or installing mods etc. — your phone might get bricked or go dead permanently. No one wants that, right?
    • Most of the tutorials and how-to guides on iDroid Horizon are for factory unlocked Android phones and tablets. We recommend NOT to try our guides if your phone is locked to a carrier, unless we have specified the carrier name or device model. And also make sure you have an unlocked bootloader (except Samsung).
    If you find the above tips useful and they were helpful to you, please consider giving us a +1 or LIKE to thank us!

    All set and ready? Good. Now, let’s proceed with the tutorial below and update YU Yureka AO5510 to CyanogenMod 12.1 Lollipop custom firmware.

    How to Install CyanogenMod 12.1 Lollipop on YU Yureka AO5510 :

    We have put together a detailed step-by-step instructions guide on how to install CyanogenMod 12.1 Lollipop custom firmware on YU Yureka AO5510. If you are used to installing custom ROMs on your YU Yureka AO5510, then this should not be any different for you.

    However, for beginners, you need to root your YU Yureka and install a custom recovery. Please Google that up if you are unsure and make sure you read the tutorial once before actually performing it on your device.

    To Remember:
    • This Android 5.1 CyanogenMod 12.1 ROM tutorial is only for the YU Yureka AO5510 phone.
    • Your phone should have ClockworkMod recovery installed. Please make sure you have this recovery!
    • Make a Nandroid backup of your previous phone set up before proceeding – for just in case anything goes wrong.
    • This tutorial will wipe out all your existing data. Proceed at your own risk.

    Complete Step-By-Step Instructions:

    Step 1 - Download cm-12.1-20150613-NIGHTLY-tomato.zip  and Google Apps for YU Yureka AO5510 on your PC, if you haven’t already.

    Step 2 - Connect your YU Yureka AO5510 to your computer using the USB cable.

    Step 3 - Now copy/paste the downloaded cm-12.1-20150613-NIGHTLY-tomato.zip  and Google Apps zip files to your SD card. Make sure the files are in the SD card root (not in any folder).

    Step 4 - Please make sure Fastboot is configured and properly installed on your computer. How? See here: How to Set Up ADB and Fastboot with Android SDK.

    Step 5 - Then turn OFF your phone and disconnect from the USB cable.

    Step 6 - Get into the Fastboot/Bootloader Mode on your device. Turn ON the phone while pressing and holding the Volume Up + Power buttons till you see the Fastboot menu and START on top.

    Step 7 - Now to get in the Bootloader Mode. Turn ON the phone while pressing and holding the Volume Up + Volume Down and Power buttons.

    Step 8 - Follow the navigation instructions on the screen. Select BOOTLOADER and then go to RECOVERY.

    Step 9 - Once you are in ClockworkMod Recovery, select perform a full data wipe by selecting “wipe data/factory reset” . Use the Power button to select everything while in the Recovery Mode.

    Step 10 - Then, perform a cache wipe by selecting “wipe cache partition” as you can see in the image below.

    Step 11 - Now this is optional, but it is recommended to perform a wipe of your dalvik cache as well. You will not get into boot loops or any other errors. From CWM recovery, go to ‘advanced’ and then select “wipe dalvik cache”.

    Step 12 - Then go back to the main recovery screen and select “install zip from SD card”.

    Step 13 - Now select “choose zip from sdcard”. Using your volume keys, navigate to the cm-12.1-20150613-NIGHTLY-tomato.zip file that you copied to your SD card and select it using the Power button. Confirm the installation on the next screen and the installation procedure should start now.
    Google Apps: Repeat the Step 12 for the GApps zip file as well and install it on your phone.
    Step 14 - After the installation completes, go to “+++++Go Back+++++” and reboot the phone by selecting “reboot system now” from the recovery menu.

    Your YU Yureka AO5510 will boot now and it might take about 5 minutes to boot on your first time. So, please wait.

    That’s it! Your YU Yureka AO5510 should now have CyanogenMod 12.1 Lollipop custom ROM installed on your phone! Go to Settings > About phone to verify.

    Hit +1 or LIKE to thank us!

    Have fun playing with the new CyanogenMod 12.1 Lollipop. All the instructions are clearly given above, but if you have any issues, please let us know by commenting below.
    Read More