Showing posts with label Official Firmware. Show all posts

June 05, 2015

// // Leave a Comment

Update Galaxy S6 G920F to XXU1AOCV Android 5.0.2 Lollipop Official Firmware

Samsung Galaxy S6 G920F receives new XXU1AOCV Android 5.0.2 Lollipop Official Firmware update on 28 March 2015. This update is being pushed only to Poland region through OTA (over-the-air) update system. If you want to get this latest firmware on your Galaxy S6 G920F, then we have a complete guide on how to install XXU1AOCV Android 5.0.2 Lollipop on Galaxy S6 G920F device manually with Odin.

Please keep in mind that this is an Official Firmware, not a modified custom ROM. You can easily install XXU1AOCV Android 5.0.2 Lollipop on Galaxy S6 G920F using our tutorial given below. I recommend you to read this article once before actually performing it on your device.

Image Credit : www.tomsguide.com
As you continue reading below, we will provide you all the necessary tips like How to Backup Android Devices before installing any official firmwares or custom roms and many more. We will install this official firmware by using ODIN which is the safe method to manually install a new firmware update on your phone.
Remember! If the flashing process is interrupted (e.g. with KIES) your phone might be very difficult to revive. So I recommend you to update your Android device manually using our tutorial below. Firmwares provided by iDroid Horizon are not modified, provided ‘as is’ from Samsung/Google servers.
Disclaimer: All the custom ROMs and firmwares, official software updates, tools, mods or anything mentioned in the tutorial belong to their respective owners/developers. We (iDroid Horizon) or the developers are not to be held responsible if you damage or brick your device. We don’t have you on gun point to try out this tutorial

Details about XXU1AOCV Android 5.0.2 Lollipop Firmware:

Model  : SM-G920F
Model name : GALAXY S6
Country : Poland (Play)
Version :  Android 5.0.2
Changelist : 4497415
Build date : Sat, 28 Mar 2015 10:51:21 +0000
Product code : PRT
PDA : G920FXXU1AOCV
CSC  : G920FPRT1AOCN

There are tons of useful articles and how-to guides on iDroid Horizon for the Samsung Galaxy S6 G920F, but we think you might be interested in the following posts:

Android USB Driver for Galaxy S6 G920F

You must have USB Driver installed in your Computer to connect your Android Device. Please make sure you have installed it before flashing any ROMs or Firmware. If you don't have USB Driver from before, you can download the latest  official USB Driver from our Android USB Driver Section here:

Backup and some important tips

Backup your all important data and apps because during any installation of a new custom ROM or Official Firmware , your device will be wiped and cleaned with new operating system. Make a backup for just in case, you never know when anything might go wrong. Read below for some important tips on how to backup Android data in a easy process:
Samsung user can also backup data by using Official Sumsang Kies. If you backup data manually, you will get more options for what to choose from. You can also move your data to other Android devices from different manufacturers, i.e moving Samsung Galaxy S6 backup data to Google Nexus 10. If you already have a custom recovery (ClockworkMod, TWRP etc.) installed on your phone, we strongly recommend a backup using that as it creates a complete image of your existing phone set up.

Few more important things that you must remember before installing any custom ROMs or Official Firmwares:

  • You might face some problems in connecting your Android device to the computer. How to fix? You need to enable USB debugging mode. See here: How to Enable USB Debugging — for Gingerbread, Ice Cream Sandwich and KitKat.
  •  Make sure your Android device is charged up to 80-85% battery level. This might help you: How to Check Battery Percentage.  Why? Because, if your phone goes off suddenly while installing a custom ROM, flashing an official firmware update or installing mods etc. — your phone might get bricked or go dead permanently. No one wants that, right?
  • Most of the tutorials and how-to guides on iDroid Horizon are for factory unlocked Android devices. We recommend NOT to try our guides if your device is locked to a carrier, unless we have specified the device model or carrier name.
If you find the above tips are helpful for you, please consider giving us a +1 or Like on our Facebook Fan Page to thank us!

All set and ready? Good. You can now proceed to the tutorial below and update Galaxy S6 G920F to XXU1AOCV Android 5.0.2 Lollipop official stock firmware.
How to Install XXU1AOCV Android 5.0.2 Lollipop on Galaxy S6 G920F

We have put together all detailed step-by-step  guides on how to update Samsung Galaxy S6 G920F to XXU1AOCV Android 5.0.2 Lollipop. If you are used to installing official updates through ODIN on Samsung Galaxy devices, then this should not be any different for you. Please read every line carefully and make sure you read the entire tutorial once before actually performing it on your phone.

To Remember:
  1. This tutorial for installing XXU1AOCV Android 5.0.2 is only for Samsung Galaxy S6 G920F. Please don’t try this with other Android device.
  2. This is an official Samsung firmware, not a custom ROM or a modified firmware.
  3. Make sure you backup all your data in your phone before proceeding.
    Rooting Warning: This is an official Android 5.0.2 build XXU1AOCV update for Galaxy S6 G920F, which means you will lose root after installing this update. You will again have to root Galaxy S6 to gain full system access and be able to install root apps again. We will post an article soon on How to Root Galaxy S6 G920F Official Firmware. So stay tuned with us.

    Entire Step-By-Step procedure:

    Step 1 - Download Android 5.0.2 T805XXU1BOCC for Galaxy S6 G920F to your computer and extract the zip file.

    Step 2 - Download ODIN v3.07 which will help you to install Android 5.0.2 on Samsung Galaxy S6 G920F.

    Step 3 - Switch OFF your phone. Now go to Download Mode. How? Press and hold the Volume Down + Home buttons together, and then press the Power button till you see the construction Android robot and a triangle. Press Power again to confirm to enter into Download Mode.

    Step 4 - Make sure you have your Galaxy S6 G920F USB drivers installed on your computer.

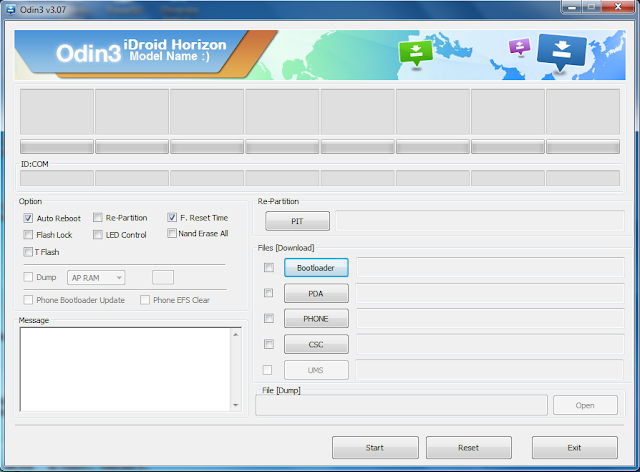
    Step 5 - Open ODIN on your computer. Connect your phone to your computer while your phone is in the Download Mode.

    Odin

    Step 6 - If your phone is connected successfully, one of the ID:COM boxes will turn yellow with the COM port number. This step might take some time.

    Step 7 - Now select the files that you have to flash/install on your phone. These files are to be found from the extracted files in Step 1.
    • Click on ‘PDA’ and select file with ‘CODE’ in its name.
    • Click on ‘Phone’ and select file with ‘MODEM’ in its name. Ignore this step if there is no such file.
    • Click on ‘CSC’ and select file with CSC’ in its name. Ignore this step if there is no such file.
    • Click on ‘PIT’ and select the .pit file. Ignore this step if there is no such file.
    Step 8 - In ODIN, check the Auto Reboot and F. Reset Time options. As for the Re-Partition option, check it ONLY if you selected a .PIT file in the above step.

    Step 9 - Now click on the Start button in ODIN. Installation process will start and would take a few minutes to complete.

    Step 10 - After the installation is completed, your phone will restart. After you see the home screen, unplug your phone from the computer.

    That’s it. Your Samsung Galaxy S6 has now been updated to Android 5.0.2 build XXU1AOCV software update. Go to Settings > About phone to verify what build have you installed.

    Hit +1 or Like on Facebook to thank us!

    If you run into any problems, feel free to drop us a comment below and we will reply you back ASAP with the fix or the solution to your problem.
    Read More

    May 11, 2015

    // // Leave a Comment

    Update Android One to Official Android 5.1 Lollipop [LMY47O]

    Android One lollipop update is now available for download. You can now update your Android One device to LMY47O Android 5.1.0 Lollipop Official Firmware. We have captured OTA of all the three Android One devices. We have Captured Micromax Android One Lollipop update from android-build@vpbs1.mtv.corp.google.com #1 ! Android One update Lollipop in India has been captured lately. But now all the stock firmware are available to download. We have Captured the following firmwares :
    • Android 5.1 for Karbonn Sparkle V
    • Android 5.1 for Spice Dream UNO
    • Android 5.1 for Micromax Canvas A1
    All the three devices are the PURE Android i.e quality certified by Google. Google tests Android One phones to ensure they’re fast and responsive and that they stay that way over time. These device are designed is such a way that it can gets the new version of Android OS from Google soon after it’s released. So stay tuned with us to get the latest Android One update.

    Update Android One to Lollipop

    Disclaimer: All the official firmwares, custom ROMs, software updates, themes, mods, tools, apps, or anything provided in our blog belongs to their respective developers. Most of the custom ROMs we are providing belongs to XDA Developers. We (iDroid Horizon) or the respective developers are not responsible if any of our tutorial damage or brick your device. However if you follow our instruction properly, we hope it would not bring you in trouble. If you face any problems with our tutorials, please comment below. We are sure that we can bring your device in original position.

    Also See: Earn Extra Mobile Recharge with High Paying mCent App — $275 Profit

    As you continue reading below, we will provide you all the necessary tips like How to Backup Android Devices before installing any official firmwares or custom roms and many more.

    Backup and some important tips

    Backup your all important data and apps because during any installation of a new custom ROM or Official Firmware , your device will be wiped and cleaned with new operating system. Make a backup for just in case, you never know when anything might go wrong. Read below for some important tips on how to backup Android data in a easy process:

    Few more important things that you must remember before installing any custom ROMs or Official Firmwares:

    • You might face some problems in connecting your Android device to the computer. How to fix? You need to enable USB debugging mode. See here: How to Enable USB Debugging — for Gingerbread, Ice Cream Sandwich and KitKat.
    •  Make sure your Android device is charged up to 80-85% battery level. This might help you: How to Check Battery Percentage.  Why? Because, if your phone goes off suddenly while installing a custom ROM, flashing an official firmware update or installing mods etc. — your phone might get bricked or go dead permanently. No one wants that, right?
    • Most of the tutorials and how-to guides on iDroid Horizon are for factory unlocked Android devices. We recommend NOT to try our guides if your device is locked to a carrier, unless we have specified the device model or carrier name.
    If you find the above tips are helpful for you, please consider giving us a +1 or Like on our Facebook Fan Page to thank us!

    Also See: How to Earn Real Cash with Android App — Journey To First $100,000

    All set and ready? Good. You can now proceed to the tutorial below and Update Android One to Official Android 5.1 Lollipop [LMY47O] !

    Remember:
    1. This tutorial for installing LMY47O Android 5.1.0 Lollipop is only for Android One devices. Please don’t try this with other Android device.
    2. This is an official Google firmware, not a custom ROM or a modified firmware.
    3. Make sure you backup all your data in your phone before proceeding.

    Rooting Warning: This is an Official LMY47O Android 5.1 Lollipop update for Android One, which means you will lose root after installing this update. You will again have to root Android One to gain full system access and be able to install root apps again. We will post an article soon on How to Root Android One official firmware. So stay tuned with us.
    NOTE: Don't factory reset your device before flashing, as this is an OTA update you can just flash it & get updated to Android Lollipop 5.1 even without losing a single piece of your phone data!

    Entire Step-By-Step procedure:

    Step 1 - Download Official LMY47O Android 5.1 Lollipop from here:
    Step 2 - Connect and mount your Android One USB memory on your computer using the USB cable.

    Step 3 - Now copy/paste the downloaded Android 5.1.0 ROM zip file to your SD card. Make sure the file is in the SD card root (not in any folder).

    Step 4 - Then turn OFF your phone and disconnect from the USB cable.

    Step 5 - Now to get in the Recovery Mode :
    • Switch off the phone.
    • Press Power button + Volume Up simultaneously.
    • Select Recovery mode in options (read instructions at the top of screen to select recovery option)
    •  Wait for Micromax logo and then a Dead Android with exclaimation mark and "No Command" written below it.
    • Now hold Power then tap Volume up (follow the order properly) and leave it. Congratulations! You have now sucessfully booted into the stock recovery
     Step 6 - Once you are in Recovery Mod, select the Android 5.1 zip placed on your SD Card and confirm the installation on the next screen and the installation procedure should start now.

    Step 7 - After the installation completes, go to “+++++Go Back+++++” and reboot the phone by selecting “reboot system now”

    Your Android One will boot now and it might take about 5 minutes to boot on your first time. So, please wait!

    Congratulation ! Your Android One should now have LMY47O Android 5.1 Lollipop Official ROM installed on your phone! Go to Settings > About phone to verify.
    Read More

    January 02, 2015

    // // 4 comments

    Update OnePlus One to Android 5.0 Lollipop Alpha [Official Firmware]

    Recently, OnePlus Company asked you to name their ROM. They beyond excited about the response and the sheer number of entries they received. With so many of you on board, OnePlus Company know that they are well on their way to creating the next great ROM in the Android community.

    This is the first step in what will become their own custom ROM. It’s so early, in fact, that this build contains no extras beyond the stock features of AOSP Lollipop. It’s the base that they will continue to build upon, improve, and customize as OnePlus stabilize core functionalities on the latest firmware updates.

    As OnePlus look towards the official ROM release in the near future, OnePlus will keep to their promise and deliver an experience that is customizable, yet bloat-free with stock Android like simplicity by default; OnePlus wouldn’t ask you to settle for anything less. In the meantime, OnePlus thought you’d appreciate an early community preview and a progress report.
    Please be sure to read and follow all of the instructions carefully before installing! While flashing custom ROMS is covered by warranty, any issues that result from doing so are not. Proceed at your own risk.

    Step-by-Step Instruction:

    Since this is an alpha build with limited testing, please proceed with extreme caution and backup your phone before flashing this build.

    You will need to have TWRP recovery installed on your device. If you don’t have it, please follow the instructions on the site to flash recovery onto your device.

    The experience is best when you have GMS (Google Mobile Services) installed. If you have GApps package, you can install it after you flash the ROM to have access to all the google services.

    Also See: Install Minimalistic OnePlus One Boot Logo And Animation

    This build does not have a built-in recovery so if you do a clean wipe, you may have to reflash TWRP onto your device.

    Step 1: Download Oneplus_community.zip and copy the file to your phone. On a Mac, you can use Android File Transfer. If you have TWRP installed, you should see a TWRP folder, and that’s where you want to place the zip.

    Step 2: Boot into TWRP recovery. You can do this on your OPO by holding both the volume down and power buttons.

    Step 3: Once you are in the recovery interface, the first thing you want to do is go to Wipe and do a factory reset to clean your data, cache, and Dalvik. Note that you will lose all of your files so make sure everything is backed up before continuing.

    Step 4: After the wipe, go to install and find the zip you copied to your device and confirm flash. This should flash the ROM to your device.

    Step 5: After flash is complete. Clear your cache again. If you have GApps, install it now. Reboot your phone.

    Step 6: You should now be booted into the new ROM.

    That’s it! Your OnePlus One should now have Android 5.0 Lollipop Alpha Official Firmware installed on your phone!

    Notes: [General]

    Known issues -
    • Data roaming is on by default. Make sure to turn if off to avoid potential charges.
    • As always, flashing a custom ROM incurs the risk of bricking your phone. Make sure you know what you’re doing and backup everything.
    • Camera and video may be unstable. This build supports 4k video, however quality may be low as we are still fine-tuning the camera.
    • Capacitive keys do not turn off when you enable software keys.
    • Clock crashes periodically.
    • If using the new app pinning feature in L, make sure to turn on the software keys first. Otherwise, you will have to reboot your machine.
    • On first boot, startup time will be a bit slow. Rest assured we will speed things up in the future.
    • Wi-Fi may be unstable.
    • This build is not eligible for OTA updates.
    Read More

    June 21, 2014

    // // 2 comments

    Update Galaxy Note 3 N9005 to ZHUENF1 Android 4.4.2 KitKat Official Firmware

    Samsung Galaxy Note 3 LTE N9005 receives new ZHUENF1 Android 4.4.2 KitKat Official Firmware update on 05 Jun 2014. This update is being pushed only to Hong Kong region through Samsung KIES and OTA (over-the-air) update system. If you want to get this latest firmware on your Galaxy Note 3 N9005, then we have a complete guide on how to install ZHUENF1 Android 4.4.2 KitKat on Galaxy Note 3 N9005 device manually. Please keep in mind that this is an Official Firmware, not a modified custom ROM. You can easily install ZHUENF1 Android 4.4.2 KitKat on Galaxy Note 3 N9005 using our tutorial given below. I recommend you to read this article once before actually performing it on your device.
    Remember! If the flashing process is interrupted (e.g. with KIES) your phone might be very difficult to revive. So I recommend you to update your Android device manually using our tutorial below. Firmwares provided by iDroid Horizon are not modified, provided ‘as is’ from Samsung/carrier servers.
    As you continue reading below, we will provide you all the necessary tips like How to Backup Android Devices before installing any official firmwares or custom roms and many more. We will install this official firmware by using ODIN which is the easiest method to install a new firmware update manually on android devices. But still we suggest you to backup your phone because you never know when something might go wrong. Let's start the tutorial below for safe and successful installation.

    Galaxy Note 3 N9005

    There are Tons of Article on iDroid Horizon for Galaxy Note 3 LTE N9005, but we recommend you the following posts:
    Disclaimer: All the official firmwares, custom ROMs, software updates, themes, mods, tools, apps, or anything provided in our blog belongs to their respective developers. Most of the custom ROMs we are providing belongs to XDA Developers. We (iDroid Horizon) or the respective developers are not responsible if any of our tutorial damage or brick your device. However if you follow our instruction properly, we hope it would not bring you in trouble. If you face any problems with our tutorials, please comment below. We are sure that we can bring your device in original position.

    Details about ZHUENF1 Android 4.4.2 Firmware:

    Model: SM-N9005
    Model name: GALAXY Note 3 LTE
    Country: Hong Kong
    Version: Android 4.4.2
    Changelist: 1860648
    Build date: Thu, 05 Jun 2014 12:29:04 +0000
    Product Code: TGY
    PDA: N9005ZHUENF1
    CSC: N9005ZZHENF1
    MODEM: N9005ZHUENF1

    Android USB Driver for Galaxy Note 3 N9005

    You must have USB Driver installed in your Computer/Laptop to connect your Android Device. Please make sure you have installed it before flashing any ROMs or Firmware. If you don't have USB Driver from before, you can download the latest  official USB Driver from our Android USB Driver Section here:
    Download Galaxy Note 3 N9005 USB Driver!

    Backup and some important tips

    Done with USB Driver? Good. Now here we go for some work that you must do before installing this firmware. Please follow the important points that you need to take care of, as we don’t want anyone losing their personal data or apps:
    Backup your all important data and apps because during any installation of a new custom ROM or Official Firmware , your device will be wiped and cleaned with new operating system. Make a backup for just in case, you never know when anything might go wrong. Read below for some important tips on how to backup Android data in a easy process:
    Samsung user can also backup data by using Official Sumsang Kies. If you backup data manually, you will get more options for what to choose from. You can also move your data to other Android devices from different manufacturers, i.e moving Samsung Galaxy S5 backup data to Google Nexus 10. If you already have a custom recovery (ClockworkMod, TWRP etc.) installed on your phone, we strongly recommend a backup using that as it creates a complete image of your existing phone set up.

    Few more important things that you must remember before installing any custom ROMs or Official Firmwares:

    • You might face some problems in connecting your Android device to the computer. How to fix? You need to enable USB debugging mode. See here: How to Enable USB Debugging — for Gingerbread, Ice Cream Sandwich and KitKat.
    •  Make sure your Android device is charged up to 80-85% battery level. This might help you: How to Check Battery Percentage.  Why? Because, if your phone goes off suddenly while installing a custom ROM, flashing an official firmware update or installing mods etc. — your phone might get bricked or go dead permanently. No one wants that, right?
    • Most of the tutorials and how-to guides on iDroid Horizon are for factory unlocked Android devices. We recommend NOT to try our guides if your device is locked to a carrier, unless we have specified the device model or carrier name.
    If you find the above tips are helpful for you, please consider giving us a +1 or Like on our Facebook Fan Page to thank us!
    All set and ready? Good. You can now proceed to the tutorial below and update Galaxy Note 3 N9005 LTE to ZHUENF1 Android 4.4.2 KitKat official stock firmware.

    How to Update Galaxy Note 3 LTE N9005 to ZHUENF1 Android 4.4.2 KitKat

    We have put together all detailed step-by-step  guides on how to update Samsung Galaxy Note 3 N9005 to ZHUENF1 Android 4.4.2 KitKat. If you are used to installing official updates through ODIN on Samsung Galaxy devices, then this should not be any different for you.
    Please read every line carefully and make sure you read the entire tutorial once before actually performing it on your phone.

    To Remember:
    1. This tutorial for installing ZHUENF1 Android 4.4.2 KitKat is only for Samsung Galaxy Note 3 LTE N9005. Please don’t try this with other Android device.
    2. This is an official Samsung firmware, not a custom ROM or a modified firmware.
    3. Make sure you backup all your data in your phone before proceeding.
    Rooting Warning: This is an official Android 4.4.2 build ZHUENF1 update for Galaxy Note 3 N9005, which means you will lose root after installing this update. You will again have to root Galaxy Note 3 N9005 to gain full system access and be able to install root apps again. We will post an article soon on How to Root Galaxy Note 3 N9005 official firmware. So stay tuned with us.

    Entire Step-By-Step procedure:

    Step 1 - Download N9005ZHUENF1 Android 4.4.2 for Galaxy Note 3 N9005 to your computer and extract the zip file:

    Step 2 - Download ODIN v3.07 which will help you to install Android 4.4.2 on Samsung Galaxy Note 3 N9005.

    Step 3 - Switch OFF your phone. Now go to Download Mode. How? Press and hold the Volume Down + Home buttons together, and then press the Power button till you see the construction Android robot and a triangle. Press Power again to confirm to enter into Download Mode.

    Step 4 - Make sure you have your Galaxy Note 3 N9005 USB drivers installed on your computer.

    Step 5 - Open ODIN on your computer. Connect your phone to your computer while your phone is in the Download Mode.

    Odin

    Step 6 - If your phone is connected successfully, one of the ID:COM boxes will turn yellow with the COM port number. This step might take some time.

    Step 7 - Now select the files that you have to flash/install on your phone. These files are to be found from the extracted files in Step 1.
    • Click on ‘PDA’ and select file with ‘CODE’ in its name.
    • Click on ‘Phone’ and select file with ‘MODEM’ in its name. Ignore this step if there is no such file.
    • Click on ‘CSC’ and select file with CSC’ in its name. Ignore this step if there is no such file.
    • Click on ‘PIT’ and select the .pit file. Ignore this step if there is no such file.
    Step 8 - In ODIN, check the Auto Reboot and F. Reset Time options. As for the Re-Partition option, check it ONLY if you selected a .PIT file in the above step.

    Step 9 - Now click on the Start button in ODIN. Installation process will start and would take a few minutes to complete.

    Step 10 - After the installation is completed, your phone will restart. After you see the home screen, unplug your phone from the computer.

    That’s it. Your Samsung Galaxy Note 3 N9005 has now been updated to Android 4.4.2 KitKat build ZHUENF1 software update. Go to Settings > About phone to verify what build have you installed.

    Hit +1 or Like on Facebook to thank us!
    If you run into any problems, feel free to drop us a comment below and we will reply you back ASAP with the fix or the solution to your problem.
    Read More

    June 14, 2014

    // // Leave a Comment

    Update Galaxy Tab Pro 8.4 To ZCU1AND2 Android 4.4.2 KitKat Official Firmware

    Samsung Galaxy Tab Pro 8.4 T321 receives new ZCU1AND2 Android 4.4.2 KitKat Official Firmware update on 07 April 2014. This update is being pushed only to China region through Samsung KIES and OTA (over-the-air) update system. If you want to get this latest firmware on your Galaxy Tab Pro 8.4, then we have a complete guide on how to install ZCU1AND2 Android 4.4.2 KitKat on Galaxy Tab Pro 8.4 device manually. Please keep in mind that this is an Official Firmware, not a modified custom ROM. You can easily install ZCU1AND2 Android 4.4.2 KitKat on Galaxy Tab Pro 8.4 using our tutorial given below. I recommend you to read this article once before actually performing it on your device.

    Remember! If the flashing process is interrupted (e.g. with KIES) your phone might be very difficult to revive. So I recommend you to update your Android device manually using our tutorial below. Firmwares provided by iDroid Horizon are not modified, provided ‘as is’ from Samsung/carrier servers.

    As you continue reading below, we will provide you all the necessary tips like How to Backup Android Devices before installing any official firmwares or custom roms and many more. We will install this official firmware by using ODIN which is the easiest method to install a new firmware update manually on android devices.
    But still we suggest you to backup your phone because you never know when something might go wrong.
    Let's start the tutorial below for safe and successful installation.
    Galaxy Tab Pro 8.4
    Image Source: www.lelong.com.my
    Disclaimer: All the official firmwares, custom ROMs, software updates, themes, mods, tools, apps, or anything provided in our blog belongs to their respective developers. Most of the custom ROMs we are providing belongs to XDA Developers. We (iDroid Horizon) or the respective developers are not responsible if any of our tutorial damage or brick your device. However if you follow our instruction properly, we hope it would not bring you in trouble. If you face any problems with our tutorials, please comment below. We are sure that we can bring your device in original position.

    Details about ZCU1AND2 Android 4.4.2 Firmware:

    Model: SM-T321
    Model name: Galaxy Tab Pro 8.4
    Country: China
    Version: Android 4.4.2
    Changelist: 1198683
    Build date: 07.04.2014
    PDA: T321ZCU1AND2
    CSC: T321CHN1AND2
    MODEM: T321ZCU1AND2

    Also Read:  Install XXU1BNE5 Android 4.4 KitKat on Galaxy Tab Pro 8.4 T321

    Android USB Driver for Galaxy Tab Pro 8.4

    You must have USB Driver installed in your Computer/Laptop to connect your Android Device. Please make sure you have installed it before flashing any ROMs or Firmware. If you don't have USB Driver from before, you can download the latest  official USB Driver from our Android USB Driver Section here:
    Download Galaxy Tab Pro 8.4 USB Driver!

    Backup and some important tips

    Done with USB Driver? Good. Now here we go for some work that you must do before installing this firmware. Please follow the important points that you need to take care of, as we don’t want anyone losing their personal data or apps:
    Backup your all important data and apps because during any installation of a new custom ROM or Official Firmware , your device will be wiped and cleaned with new operating system. Make a backup for just in case, you never know when anything might go wrong. Read below for some important tips on how to backup Android data in a easy process:
    Samsung user can also backup data by using Official Sumsang Kies. If you backup data manually, you will get more options for what to choose from. You can also move your data to other Android devices from different manufacturers, i.e moving Samsung Galaxy S5 backup data to Google Nexus 10. If you already have a custom recovery (ClockworkMod, TWRP etc.) installed on your phone, we strongly recommend a backup using that as it creates a complete image of your existing phone set up.

    Few more important things that you must remember before installing any custom ROMs or Official Firmwares:

    • You might face some problems in connecting your Android device to the computer. How to fix? You need to enable USB debugging mode. See here: How to Enable USB Debugging — for Gingerbread, Ice Cream Sandwich and KitKat.
    •  Make sure your Android device is charged up to 80-85% battery level. This might help you: How to Check Battery Percentage.  Why? Because, if your phone goes off suddenly while installing a custom ROM, flashing an official firmware update or installing mods etc. — your phone might get bricked or go dead permanently. No one wants that, right?
    • Most of the tutorials and how-to guides on iDroid Horizon are for factory unlocked Android devices. We recommend NOT to try our guides if your device is locked to a carrier, unless we have specified the device model or carrier name.
    If you find the above tips are helpful for you, please consider giving us a +1 or Like on our Facebook Fan Page to thank us!
    All set and ready? Good. You can now proceed to the tutorial below and update Galaxy Tab Pro 8.4 to ZCU1AND2 Android 4.4.2 KitKat official stock firmware.

    How to Install ZCU1AND2 Android 4.4.2 KitKat on Galaxy Tab Pro 8.4

    We have put together all detailed step-by-step  guides on how to update Samsung Galaxy Tab Pro 8.4 to ZCU1AND2 Android 4.4.2 KitKat. If you are used to installing official updates through ODIN on Samsung Galaxy devices, then this should not be any different for you.
    Please read every line carefully and make sure you read the entire tutorial once before actually performing it on your phone.

    To Remember:
    1. This tutorial for installing ZCU1AND2 Android 4.4.2 KitKat is only for Samsung Galaxy Tab Pro 8.4 T321. Please don’t try this with other Android device.
    2. This is an official Samsung firmware, not a custom ROM or a modified firmware.
    3. Make sure you backup all your data in your phone before proceeding.
    Rooting Warning: This is an official Android 4.4.2 build ZCU1AND2 update for Galaxy Tab Pro 8.4, which means you will lose root after installing this update. You will again have to root Galaxy Tab Pro 8.4 to gain full system access and be able to install root apps again. We will post an article soon on How to Root Galaxy Tab Pro 8.4 official firmware. So stay tuned with us.

    Entire Step-By-Step procedure:

    Step 1 - Download Android 4.4.2 T321ZCU1AND2 for Galaxy Tab Pro 8.4 to your computer and extract the zip file:
    Step 2 - Download ODIN v3.07 which will help you to install Android 4.4.2 on Samsung Galaxy Tab Pro 8.4.

    Step 3 - Switch OFF your phone. Now go to Download Mode. How? Press and hold the Volume Down + Home buttons together, and then press the Power button till you see the construction Android robot and a triangle. Press Power again to confirm to enter into Download Mode.

    Step 4 - Make sure you have your Galaxy Tab Pro 8.4 USB drivers installed on your computer.

    Step 5 - Open ODIN on your computer. Connect your phone to your computer while your phone is in the Download Mode.

    Odin

    Step 6 - If your phone is connected successfully, one of the ID:COM boxes will turn yellow with the COM port number. This step might take some time.

    Step 7 - Now select the files that you have to flash/install on your phone. These files are to be found from the extracted files in Step 1.
    • Click on ‘PDA’ and select file with ‘CODE’ in its name.
    • Click on ‘Phone’ and select file with ‘MODEM’ in its name. Ignore this step if there is no such file.
    • Click on ‘CSC’ and select file with CSC’ in its name. Ignore this step if there is no such file.
    • Click on ‘PIT’ and select the .pit file. Ignore this step if there is no such file.
    Step 8 - In ODIN, check the Auto Reboot and F. Reset Time options. As for the Re-Partition option, check it ONLY if you selected a .PIT file in the above step.

    Step 9 - Now click on the Start button in ODIN. Installation process will start and would take a few minutes to complete.

    Step 10 - After the installation is completed, your phone will restart. After you see the home screen, unplug your phone from the computer.

    That’s it. Your Samsung Galaxy Tab Pro 8.4 has now been updated to Android 4.4.2 KitKat build ZCU1AND2 software update. Go to Settings > About phone to verify what build have you installed.

    Hit +1 or Like on Facebook to thank us!
    If you run into any problems, feel free to drop us a comment below and we will reply you back ASAP with the fix or the solution to your problem.
    Read More

    June 12, 2014

    // // 3 comments

    Update Galaxy S2 I9100 to XWMS3 Android 4.1.2 Jelly Bean Official Firmware

    Samsung Galaxy S2 Update 4.4 is not available because Samsung is not going to bring official Android 4.4 for this devices due to its hardware specification. But still there are many Samsung S2 firmware update available to download. Here I am providing the Galaxy S2 latest update i.e. XWMS3 Android 4.1.2. This update is being pushed only to Spain region through Samsung KIES and OTA (over-the-air) update system. If you want to get this latest firmware on your Galaxy S2 I9100, then we have a complete guide on how to install XWMS3 Android 4.1.2 Jelly Bean on Galaxy S2 I9100 device. Please keep in mind that this is an Official Firmware update for Samsung Galaxy S2, not a modified custom ROM. You can easily install XWMS3 Android 4.1.2 Jelly Bean on Galaxy S2 I9100 using our tutorial given below. I recommend you to read this article once before actually performing it on your device.

    As you continue reading below, we will provide you all the necessary tips like How to Backup Android Devices before installing any official firmwares or custom roms and many more. We will install this stock firmware by using ODIN which will be the safest method to manually install Samsung Galaxy S2 GT-I9100 firmware update. But still we suggest you to backup your phone because you never know when something might go wrong. Let's start the tutorial below for safe and successful installation.
    Galaxy S2 I9100 Jelly Bean

    Disclaimer: All the official firmwares, custom ROMs, software updates, themes, mods, tools, apps, or anything provided in our blog belongs to their respective developers. Most of the custom ROMs we are providing here are from XDA Developers. We (iDroid Horizon) or the respective developers are not responsible if any of our tutorial damage or brick your device. However if you follow our instruction properly, we hope it would not bring you in trouble. If you face any problems with our tutorials, please comment below. We are sure that we can bring your device in original position.

    Details about XWMS3 Android 4.1.2 Firmware:

    Model: GT-I9100
    Model name: GALAXY S II
    Country: Spain
    Version: Android 4.1.2
    Changelist: 1497824
    Build date: 23 December, 2013
    PDA: I9100XWMS3
    CSC: N/A

    Android USB Driver for Galaxy S2 I9100

    You must have USB Driver installed in your Computer/Laptop to connect your Android Device. Please make sure you have installed it before flashing any ROMs or Firmware. If you don't have USB Driver from before, you can download the latest  official USB Driver from our Android USB Driver Section here:
    Download Galaxy S2 USB Driver!

    Backup and some important tips

    Done with USB Driver? Good. Now here we go for some work that you must do before installing this firmware. Please follow the important points that you need to take care of, as we don’t want anyone losing their personal data or apps:
    Backup your all important data and apps because during any installation of a new custom ROM or Official Firmware , your device will be wiped and cleaned with new operating system. Make a backup for just in case, you never know when anything might go wrong. Read below for some important tips on how to backup Android data in a easy process:
    Samsung user can also backup data by using Official Sumsang Kies. If you backup data manually, you will get more options for what to choose from. You can also move your data to other Android devices from different manufacturers, i.e moving Samsung Galaxy S5 backup data to Google Nexus 10. If you already have a custom recovery (ClockworkMod, TWRP etc.) installed on your phone, we strongly recommend a backup using that as it creates a complete image of your existing phone set up.

    Few more important things that you must remember before installing any custom ROMs or Official Firmwares:

    • You might face some problems in connecting your Android device to the computer. How to fix? You need to enable USB debugging mode. See here: How to Enable USB Debugging — for Gingerbread, Ice Cream Sandwich and KitKat.
    •  Make sure your Android device is charged up to 80-85% battery level. This might help you: How to Check Battery Percentage.  Why? Because, if your phone goes off suddenly while installing a custom ROM, flashing an official firmware update or installing mods etc. — your phone might get bricked or go dead permanently. No one wants that, right?
    • Most of the tutorials and how-to guides on iDroid Horizon are for factory unlocked Android devices. We recommend NOT to try our guides if your device is locked to a carrier, unless we have specified the device model or carrier name.
    If you find the above tips are helpful for you, please consider giving us a +1 or Like on our Facebook Fan Page to thank us!
    All set and ready? Good. You can now proceed to the tutorial below and update Galaxy S2 I9100 to XWMS3 Android 4.1.2 Jelly Bean official stock firmware.

    How to update your Samsung galaxy S2 with XWMS3 Android 4.1.2

    We have put together all detailed step-by-step  guides on how to update a Samsung Galaxy S2 with XWMS3 Galaxy S2 Jelly Bean ROM. If you are used to installing official updates through ODIN on Samsung Galaxy devices, then this should not be any different for you.
    Please read every line carefully and make sure you read the entire tutorial once before actually performing it on your phone.

    To Remember:
    1. This tutorial for installing XWMS3 Android 4.1.2 is only for Samsung Galaxy S2 I9100. Please don’t try this with other Android device.
    2. This is an official Samsung firmware, not a custom ROM or a modified firmware.
    3. Make sure you backup all your data in your phone before proceeding.
    Rooting Warning: This is Samsung Galaxy S2 official rom update, which means you will lose root after installing this update. You will again have to root Galaxy S2 to gain full system access and be able to install root apps again.

    Entire Step-By-Step procedure:

    Step 1 - Download Android 4.1.2 I9100XWMS3 for Galaxy S2 to your computer and extract the zip file:
    Step 2 - Download ODIN v3.07 which will help you to install Samsung Galaxy S2 latest update.

    Step 3 - Switch OFF your phone. Now go to Download Mode. How? Press and hold the Volume Down + Home buttons together, and then press the Power button till you see the construction Android robot and a triangle. Press Power again to confirm to enter into Download Mode.

    Step 4 - Make sure you have your Galaxy S2 USB drivers installed on your computer.

    Step 5 - Open ODIN on your computer. Connect your phone to your computer while your phone is in the Download Mode.

    Odin

    Step 6 - If your phone is connected successfully, one of the ID:COM boxes will turn yellow with the COM port number. This step might take some time.

    Step 7 - Now select the files that you have to flash/install on your phone. These files are to be found from the extracted files in Step 1.
    • Click on ‘PDA’ and select file with ‘CODE’ in its name.
    • Click on ‘Phone’ and select file with ‘MODEM’ in its name. Ignore this step if there is no such file.
    • Click on ‘CSC’ and select file with CSC’ in its name. Ignore this step if there is no such file.
    • Click on ‘PIT’ and select the .pit file. Ignore this step if there is no such file.
    Step 8 - In ODIN, check the Auto Reboot and F. Reset Time options. As for the Re-Partition option, check it ONLY if you selected a .PIT file in the above step.

    Step 9 - Now click on the Start button in ODIN. Installation process will start and would take a few minutes to complete.

    Step 10 - After the installation is completed, your phone will restart. After you see the home screen, unplug your phone from the computer.

    That’s it. Your Samsung Galaxy S II has now been updated to Android 4.1.2 build XWMS3 software update. Go to Settings > About phone to verify what build have you installed.

    Hit +1 or Like on Facebook to thank us!
    If you run into any problems, feel free to drop us a comment below and we will reply you back ASAP with the fix or the solution to your problem.
    Read More

    June 11, 2014

    // // 1 comment

    Update Galaxy Grand I9082 to XXUBNC2 Android 4.2.2 Official Firmware

    Samsung Galaxy Grand I9082 receives new XXUBNC2 Android 4.2.2 Jelly Bean Official Firmware update on 21 March 2014. This latest update for Galaxy Grand is being pushed only to Kenya region through Samsung KIES and OTA (over-the-air) update system. It is always recommended to update your device with the latest firmware whenever Samsung rolled out as with every update because Samsung introduces fixes for bugs (if any), improve/enhance overall performance in OS and sometime introduces new features. If you want to get this 4.2.2 update for Galaxy Grand, then we have a complete guide on how to update Galaxy Grand to 4.2.2 manually. Please keep in mind that this is an Official Firmware, not a modified custom ROM. You can easily install Jelly Bean 4.2.2 for Galaxy Grand using our tutorial given below. I recommend you to read this article once before actually performing it on your device.

    Remember! If the flashing process is interrupted (e.g. with KIES) your phone might be very difficult to revive. So I recommend you to update your Android device manually using our tutorial below. Firmwares provided by iDroid Horizon are not modified, provided ‘as is’ from Samsung/carrier servers.

    As you continue reading below, we will provide you all the necessary tips like How to Backup Android Devices before installing any official firmwares or custom roms and many more. We will install this official firmware by using ODIN which is the easiest method to install a new firmware update manually on android devices. But still we suggest you to backup your phone because you never know when something might go wrong. So let's start the tutorial below for safe and successful installation.
    Galaxy Grand I9082

    Disclaimer: All the official firmwares, custom ROMs, software updates, themes, mods, tools, apps, or anything provided in our blog belongs to their respective developers. Most of the custom ROMs we are providing belongs to XDA Developers. We (iDroid Horizon) or the respective developers are not responsible if any of our tutorial damage or brick your device. However if you follow our instruction properly, we hope it would not bring you in trouble. If you face any problems with our tutorials, please comment below. We are sure that we can bring your device in original position.

    Details About XXUBNC2 Samsung Galaxy Grand Update:

    Model: GT-I9082
    Model name: Galaxy Grand Duos
    Country: Kenya
    Version: Android 4.2.2
    Changelist: 1257343
    Build date: 21 March 2014
    PDA: I9082XXUBNC2
    CSC: I9082OJVBNC2
    MODEM: I9082XXUBNA3

    Also read: Install Android 4.4.2 KitKat Custom ROM on Galaxy Grand I9082

    Samsung Galaxy Grand Drivers

    How to connect Galaxy Grand to PC ? You must have USB Driver installed in your PC to connect your Android Device. Please make sure you have installed it before flashing any ROMs or Firmware. If you don't have USB Driver from before, you can download the latest  official USB Driver from our Android USB Driver Section here:
    Download Galaxy Grand I9082 USB Driver

    Backup and some important tips

    Done with USB Driver? Good. Now here we go for some work that you must do before installing this firmware. Please follow the important points that you need to take care of, as we don’t want anyone losing their personal data or apps:
    Backup your all important data and apps because during any installation of a new custom ROM or Official Firmware , your device will be wiped and cleaned with new operating system. Make a backup for just in case, you never know when anything might go wrong. Read below for some important tips on how to backup Android data in a easy process:
    Samsung user can also backup data by using Official Sumsang Kies. If you backup data manually, you will get more options for what to choose from. You can also move your data to other Android devices from different manufacturers, i.e moving Samsung Galaxy S5 backup data to Google Nexus 10. If you already have a custom recovery (ClockworkMod, TWRP etc.) installed on your phone, we strongly recommend a backup using that as it creates a complete image of your existing phone set up.

    Few more important things that you must remember before installing any custom ROMs or Official Firmwares:

    • You might face some problems in connecting your Android device to the computer. How to fix? You need to enable USB debugging mode. See here: How to Enable USB Debugging — for Gingerbread, Ice Cream Sandwich and KitKat.
    •  Make sure your Android device is charged up to 80-85% battery level. This might help you: How to Check Battery Percentage.  Why? Because, if your phone goes off suddenly while installing a custom ROM, flashing an official firmware update or installing mods etc. — your phone might get bricked or go dead permanently. No one wants that, right?
    • Most of the tutorials and how-to guides on iDroid Horizon are for factory unlocked Android devices. We recommend NOT to try our guides if your device is locked to a carrier, unless we have specified the device model or carrier name.
    If you find the above tips are helpful for you, please consider giving us a +1 or Like on our Facebook Fan Page to thank us!

    All set and ready? Good. You can now proceed to the tutorial below and update Galaxy Grand I9082 to XXUBNC2 Android 4.2.2 Jelly Bean official stock firmware.

    How to update Galaxy Grand to XXUBNC2 Android 4.2.2 Jelly Bean

    We have put together all detailed step-by-step  guides on how to update Samsung Galaxy Grand to 4.2.2 Jelly Bean. If you are used to installing official update for galaxy grand through ODIN, then this should not be any different for you.
    Please read every line carefully and make sure you read the entire tutorial once before actually performing it on your phone.

    To Remember:
    1. This tutorial for installing XXUBNC2 Android 4.2.2 Jelly Bean is only for Samsung Galaxy Grand I9082. Please don’t try this with other Android device.
    2. This is an official firmware update Galaxy Grand, not a custom ROM or a modified firmware.
    3. Make sure you backup all your data in your phone before proceeding.
    Rooting Warning: This is an official software update for Samsung Galaxy Grand duos, which means you will lose root after installing this update. You will again have to root Galaxy Grand I9082 to gain full system access and be able to install root apps again.

    Entire Step-By-Step procedure:

    Step 1 - Download 4.2 update for Galaxy Grand I9082 to your computer and extract the zip file:
    Step 2 - Download ODIN v3.07 which will help you to install Samsung Galaxy Grand 4.2 update.

    Step 3 - Switch OFF your phone. Now go to Download Mode. How? Press and hold the Volume Down + Home buttons together, and then press the Power button till you see the construction Android robot and a triangle. Press Power again to confirm to enter into Download Mode.

    Step 4 - Make sure you have your Galaxy Grand I9082 USB drivers installed on your computer.

    Step 5 - Open ODIN on your computer. Connect your phone to your computer while your phone is in the Download Mode.

    Odin 3.07

    Step 6 - If your phone is connected successfully, one of the ID:COM boxes will turn yellow with the COM port number. This step might take some time.

    Step 7 - Now select the files that you have to flash/install on your phone. These files are to be found from the extracted files in Step 1.
    • Click on ‘PDA’ and select file with ‘CODE’ in its name.
    • Click on ‘Phone’ and select file with ‘MODEM’ in its name. Ignore this step if there is no such file.
    • Click on ‘CSC’ and select file with CSC’ in its name. Ignore this step if there is no such file.
    • Click on ‘PIT’ and select the .pit file. Ignore this step if there is no such file.
    Step 8 - In ODIN, check the Auto Reboot and F. Reset Time options. As for the Re-Partition option, check it ONLY if you selected a .PIT file in the above step.

    Step 9 - Now click on the Start button in ODIN. Installation process will start and would take a few minutes to complete.

    Step 10 - After the installation is completed, your phone will restart. After you see the home screen, unplug your phone from the computer.

    That’s it. Your Samsung Galaxy Grand I9082 has now been updated to Android 4.2.2 Jelly Bean build XXUBNC2 software update. Go to Settings > About phone to verify what build have you installed.

    Hit +1 or Like on Facebook to thank us!
    If you run into any problems, feel free to drop us a comment below and we will reply you back ASAP with the fix or the solution to your problem.
    Read More
    // // Leave a Comment

    Update Galaxy Ace 2 I8160 to XXNB1 Android 4.1.2 Jelly Bean Official Firmware

    Samsung Galaxy Ace 2 I8160 receives new XXNB1 Android 4.1.2 Jelly Bean Official Firmware update on 10 February 2014. This update is being pushed only to Netherlands region through Samsung KIES and OTA (over-the-air) update system. If you want to get this latest firmware on your Samsung Galaxy Ace 2, then we have a complete guide on how to install XXNB1 Android 4.1.2 Jelly Bean on Galaxy Ace 2 I8160 device manually. Please keep in mind that this is an Official Firmware, not a modified custom ROM. You can easily install XXNB1 Android 4.1.2 Jelly Bean on Galaxy Ace 2 I8160 using our tutorial given below. I recommend you to read this article once before actually performing it on your device.

    Remember! If the flashing process is interrupted (e.g. with KIES) your phone might be very difficult to revive. So I recommend you to update your Android device manually using our tutorial below. Firmwares provided by iDroid Horizon are not modified, provided ‘as is’ from Samsung/carrier servers.

    As you continue reading below, we will provide you all the necessary tips like How to Backup Android Devices before installing any official firmwares or custom roms and many more. We will install this official firmware by using ODIN which is the easiest method to install a new firmware update manually on android devices. But still we suggest you to backup your phone because you never know when something might go wrong. So let's start the tutorial below for safe and successful installation.
    Samsung Galaxy Ace 2 I8160

    Disclaimer: All the official firmwares, custom ROMs, software updates, themes, mods, tools, apps, or anything provided in our blog belongs to their respective developers. Most of the custom ROMs we are providing belongs to XDA Developers. We (iDroid Horizon) or the respective developers are not responsible if any of our tutorial damage or brick your device. However if you follow our instruction properly, we hope it would not bring you in trouble. If you face any problems with our tutorials, please comment below. We are sure that we can bring your device in original position.

    Details about XXNB1 Android 4.1.2 Jelly Bean Firmware:

    Model: GT-I8160
    Model name: Galaxy Ace 2
    Country: Netherlands
    Version: Android 4.1.2
    Changelist: 1106830
    Build date: 10 February 2014
    PDA: I8160XXNB1
    CSC: I8160XENNE3
    MODEM: I8160XXNB1 

    Android USB Driver for Galaxy Ace 2 I8160

    You must have USB Driver installed in your Computer/Laptop to connect your Android Device. Please make sure you have installed it before flashing any ROMs or Firmware. If you don't have USB Driver from before, you can download the latest  official USB Driver from our Android USB Driver Section here:
    Download Galaxy Ace 2 I8160 USB Driver!

    Backup and some important tips

    Done with USB Driver? Good. Now here we go for some work that you must do before installing this firmware. Please follow the important points that you need to take care of, as we don’t want anyone losing their personal data or apps:
    Backup your all important data and apps because during any installation of a new custom ROM or Official Firmware , your device will be wiped and cleaned with new operating system. Make a backup for just in case, you never know when anything might go wrong. Read below for some important tips on how to backup Android data in a easy process:
    Samsung user can also backup data by using Official Sumsang Kies. If you backup data manually, you will get more options for what to choose from. You can also move your data to other Android devices from different manufacturers, i.e moving Samsung Galaxy S5 backup data to Google Nexus 10. If you already have a custom recovery (ClockworkMod, TWRP etc.) installed on your phone, we strongly recommend a backup using that as it creates a complete image of your existing phone set up.

    Few more important things that you must remember before installing any custom ROMs or Official Firmwares:

    • You might face some problems in connecting your Android device to the computer. How to fix? You need to enable USB debugging mode. See here: How to Enable USB Debugging — for Gingerbread, Ice Cream Sandwich and KitKat.
    •  Make sure your Android device is charged up to 80-85% battery level. This might help you: How to Check Battery Percentage.  Why? Because, if your phone goes off suddenly while installing a custom ROM, flashing an official firmware update or installing mods etc. — your phone might get bricked or go dead permanently. No one wants that, right?
    • Most of the tutorials and how-to guides on iDroid Horizon are for factory unlocked Android devices. We recommend NOT to try our guides if your device is locked to a carrier, unless we have specified the device model or carrier name.
    If you find the above tips are helpful for you, please consider giving us a +1 or Like on our Facebook Fan Page to thank us!

    All set and ready? Good. You can now proceed to the tutorial below and update Galaxy Ace 2 I8160 to XXNB1 Android 4.1.2 Jelly Bean official stock firmware.

    How to Update Galaxy Ace 2 I8160 to XXNB1 Android 4.1.2 Jelly Bean

    We have put together all detailed step-by-step  guides on how to update Samsung Galaxy Ace 2 I8160 to XXNB1 Android 4.1.2 Jelly Bean. If you are used to installing official updates through ODIN on Samsung Galaxy devices, then this should not be any different for you.
    Please read every line carefully and make sure you read the entire tutorial once before actually performing it on your phone.

    To Remember:
    1. This tutorial for installing XXNB1 Android 4.1.2 Jelly Bean is only for Samsung Galaxy Ace 2 I8160. Please don’t try this with other Android device.
    2. This is an official Samsung firmware, not a custom ROM or a modified firmware.
    3. Make sure you backup all your data in your phone before proceeding.
    Rooting Warning: This is an official Android 4.1.2 build XXNB1 update for Galaxy Ace 2 I8160, which means you will lose root after installing this update. You will again have to root Galaxy Ace 2 to gain full system access and be able to install root apps again. We will post an article soon on How to Root Galaxy Ace 2 official firmware. So stay tuned with us.

    Entire Step-By-Step procedure:

    Step 1 - Download Android 4.1.2 I8160XXNB1 for Galaxy Ace 2 I8160 to your computer and extract the zip file:
    Step 2 - Download ODIN v3.07 which will help you to install Android 4.1.2 on Samsung Galaxy Ace 2 I8160.

    Step 3 - Switch OFF your phone. Now go to Download Mode. How? Press and hold the Volume Down + Home buttons together, and then press the Power button till you see the construction Android robot and a triangle. Press Power again to confirm to enter into Download Mode.

    Step 4 - Make sure you have your Galaxy Ace 2 I8160 USB drivers installed on your computer.

    Step 5 - Open ODIN on your computer. Connect your phone to your computer while your phone is in the Download Mode.

    Odin 3.07

    Step 6 - If your phone is connected successfully, one of the ID:COM boxes will turn yellow with the COM port number. This step might take some time.

    Step 7 - Now select the files that you have to flash/install on your phone. These files are to be found from the extracted files in Step 1.
    • Click on ‘PDA’ and select file with ‘CODE’ in its name.
    • Click on ‘Phone’ and select file with ‘MODEM’ in its name. Ignore this step if there is no such file.
    • Click on ‘CSC’ and select file with CSC’ in its name. Ignore this step if there is no such file.
    • Click on ‘PIT’ and select the .pit file. Ignore this step if there is no such file.
    Step 8 - In ODIN, check the Auto Reboot and F. Reset Time options. As for the Re-Partition option, check it ONLY if you selected a .PIT file in the above step.

    Step 9 - Now click on the Start button in ODIN. Installation process will start and would take a few minutes to complete.

    Step 10 - After the installation is completed, your phone will restart. After you see the home screen, unplug your phone from the computer.

    That’s it. Your Samsung Galaxy Ace 2 I8160 has now been updated to Android 4.1.2 Jelly Bean build XXNB1 software update. Go to Settings > About phone to verify what build have you installed.

    Hit +1 or Like on Facebook to thank us!
    If you run into any problems, feel free to drop us a comment below and we will reply you back ASAP with the fix or the solution to your problem.
    Read More